
When you create a new product, you will have a lot of options on the PublishPress Cart metabox. In this documentation, we will explain every single item of the configuration.
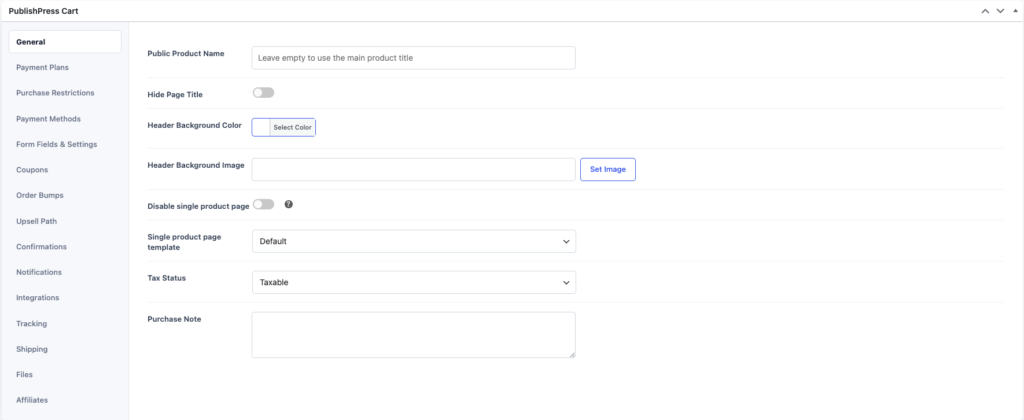
General #
The General tab controls the product page and basic product behavior.
- Public Product Name: Enter a different product name for customers. Leave this empty to use the main product title.
- Hide Page Title: Hide the product page title on the front end.
- Header Background Color: Choose the background color used in the product header.
- Header Background Image: Add an image to the product header.
- Disable single product page: Hide the built-in product checkout page. When it’s enabled, it will show “Redirect this page to” which will allow you to choose a page to redirect visitors to when the single product page is disabled.
- Single product page template: Choose the template for the single product page. You can use the default template or your theme template.
- Tax Status: Choose whether the product is taxable or non-taxable.
- Purchase Note: Add a note that customers can see after purchase.
Payment Plans #
The Payment Plans tab controls how customers pay for the product.
- On Sale?: Temporarily sell the product at a discounted price.
- Schedule Sale?: Schedule sale pricing for a specific date range.
- Sale Start: Choose when the sale starts.
- Sale End: Choose when the sale ends.
- Show original price: Show the original price next to the sale price.
- Hide Plans Section: Hide the payment plan selection area on the checkout form.
- Section Heading: Change the heading above the payment plans. The default is Payment Plan.
- Payment Plan: Add one or more payment options for the product.
When you add a payment plan, you can configure these settings:
- Plan ID: A unique ID for this payment plan.
- Price Type: Choose the type of payment. Options include one-time payment, recurring payments, pay what you want, or free.
- URL Slug: Add a unique slug for this plan. Use letters, numbers, dashes, and underscores only.
- Option Label: Add the label customers see on the checkout form.
- Sale Option Label: Add a different label when the product is on sale.
- Price: Enter the regular price.
- Sale Price: Enter the sale price.
- Frequency: Choose how often recurring payments are charged.
- Pay Interval: Choose the billing interval, such as day, week, month, or year.
- Number of Payments: Choose how many payments are required. You can also choose Never expires.
- Name Your Price Label: Change the label for pay-what-you-want pricing.
- Enable Pay What You Want: Let customers enter their own price for recurring payments.
- Sign-up Fee: Add an upfront fee for recurring payments.
- Sale Sign-up Fee: Add a discounted upfront fee during a sale.
- Trial length (in days): Add a free trial period for recurring payments.
- Process cancellations: Choose whether subscription cancellations happen immediately or at the end of the current billing period.
- Hidden: Hide this payment plan from checkout forms. At least one payment plan must remain visible.
Purchase Restrictions #
The Purchase Restrictions tab controls when and how customers can buy the product.
- Limit product sales: Limit the total number of sales for this product.
- Amount Remaining: Enter the number of products available. When this reaches zero, the cart closes.
- Limit sales per customer: Limit how many times one customer can buy the product.
- Customer purchase limit: Enter the maximum number of purchases allowed per customer.
- Limit reached message: Add the message customers see after reaching the purchase limit.
- Cart Opens: Choose the date when the cart opens.
- Cart Closes: Choose the date when the cart closes.
- Cart Closed Action: Choose what happens after the cart closes. You can display a message or redirect customers.
- Cart Closed Redirect URL: Enter the redirect URL.
- Cart Closed Message: Add the message customers see when the cart is closed.
Payment Methods #
The Payment Methods tab controls which enabled gateways customers can use for this product.
At the top of this tab, you can see the payment methods enabled globally in Cart > Settings.
Use the checkboxes to control which payment methods are available for this product. Available options can include:
- Cash on Delivery
- Credit card (Stripe)
- PayPal
- Razorpay
- Revolut
- Square Pay
- Mollie payment methods
Only gateways that are enabled and configured on your site will appear here.
Form Fields & Settings #
The Form Fields & Settings tab controls the checkout form design and fields.
- Hide field labels: Hide labels above checkout fields.
- Display address fields: Show address fields on the checkout form.
- Form Skin: Choose the checkout form layout. Options include default, 2-step, opt-in, and split-in.
2-Step Form Options #
These settings appear when you choose the 2-Step form skin:
- Tab 1 Heading: Change the first tab heading.
- Tab 2 Heading: Change the second tab heading.
- Tab 1 Subheading: Change the first tab subheading.
- Tab 2 Subheading: Change the second tab subheading.
- Step 1 Button Label: Change the button text for step one.
- Step 1 Button Sub-text: Add smaller text below the step one button.
- Step 1 Button Icon: Add an icon to the step one button.
- Icon Position: Place the icon on the left or right.
- Step 1 Footer Text: Add text below the first step.
Form design #
- Primary Color: Choose the main color for the checkout form.
- Submit Button Text: Change the checkout button text.
- Submit Button Sub-text: Add smaller text below the submit button.
- Submit Button Icon: Add an icon to the submit button.
- Icon Position: Place the icon on the left or right.
- Form Footer Text: Add text below the checkout form.
Terms and privacy #
- Show Terms checkbox: Use the default setting, enable the checkbox, or disable it.
- Terms URL: Add a custom terms URL for this product.
- Show Privacy checkbox: Use the default setting, enable the checkbox, or disable it.
- Privacy URL: Add a custom privacy URL for this product.
Default Fields #
Default fields include:
- First Name
- Last Name
- Phone Number
- Company Name
For each default field, you can change the label, make the field required, change the size, or disable it.
Custom Fields #
Use Custom Fields to collect extra information during checkout.
For each custom field, you can configure:
- Field ID: Enter a unique ID for the field.
- Label: Add the field label.
- Field Type: Choose the field type. Options include text, date, date time, dropdown, password, add-on, radio, checkbox, and hidden.
- Default Value: Add a default value.
- Required Field: Make the field required.
- Description: Add help text for the field.
- Include in Invoice: Show the field value in invoices.
- Price per Item: Add a price for add-on fields.
- Username field for new accounts: Use this field as the username when creating user accounts.
- Auto login user after purchase: Automatically log in the user after purchase. This requires a password field and a user account integration.
- Selections: Add the choices for dropdown, checkbox, or radio fields.
Address Fields #
These settings appear when Display address fields is enabled.
Default address fields include:
- Country
- Address
- Address Line 2
- Town / City
- State / County
- Postcode / Zip
You can change the heading, labels, required status, and field size.
Coupons #
The Coupons tab lets you create coupons for this product.
- Show Coupon Field: Show the coupon field on the checkout form.
- Coupon: Add one or more coupon codes.
For each coupon, you can configure:
- Coupon Code: Enter the coupon code customers will use.
- Coupon URL: Create a URL that automatically applies the coupon.
- Discount Type: Choose the type of discount. You can discount the plan price or cart total by a fixed amount or percentage.
- Amount Off: Enter the discount amount.
- Amount Off for Recurring Payments: Enter a separate discount for recurring payments. Leave it empty to use the main amount.
- Allowed Plans: Restrict the coupon to specific payment plans.
- Coupon Duration: Enter how many months the discount applies to recurring payments.
- Discount Applied Text: Customize the success message shown after the coupon is applied.
- Redemption Limit: Limit how many times the coupon can be used.
- Coupon Code Expires: Set an expiration date and time.
- Valid for: Limit how long the coupon is valid after another product is purchased.
- after purchasing: Choose the product that starts the valid period.
- One redemption per customer: Limit each customer to one use.
- Coupon CSV File: Upload a CSV file to import coupon codes in bulk.
Order Bumps #
The Order Bumps tab lets you add extra offers to the checkout form.
- Enable Order Bump: Turn on the main order bump.
- Background Color: Choose the background color for the bump box.
- Select Product: Choose the product used for the bump offer.
- Use existing payment plan: Use an existing payment plan from the selected product.
- Payment Plan ID: Choose the payment plan for the bump.
- Price: Enter a custom price if you are not using an existing payment plan.
- Product Image: Add an image for the bump offer.
- Image Position: Show the image on the left or top.
- Checkbox Label: Change the checkbox text.
- Headline: Add the bump headline.
- Product Description: Add the bump description.
- Custom plan description: Add a custom plan description in the order summary.
- Replace main product: Replace the main product with the bump product when selected.
- Replace shipping: Replace the main product shipping with the order bump shipping.
Additional Bumps #
Use Additional Bumps to add more than one order bump.
Each additional bump includes similar settings, including product, price type, payment plan, price, image, checkbox label, headline, and description.
Upsell Path #
The Upsell Path tab connects this product to a post-purchase upsell flow.
- Select Path: Choose the upsell path that should start after this product is purchased.
If you have not created any upsell paths yet, the tab will show a link to create one.
Confirmations #
The Confirmations tab controls what customers see after checkout.
Default Confirmation #
- Confirmation Type: Choose what happens after purchase. Options include display message, display page, or perform redirect.
- Message: Enter the message shown after purchase.
- Select Page: Choose a WordPress page to show after purchase.
- Thank You Page URL: Enter the URL customers are redirected to.
Conditional Confirmations #
Conditional confirmations let you show different thank-you pages or URLs based on order details.
For each conditional confirmation, you can configure:
- Name: Add an internal name.
- Order flows that match: Choose whether all rules or any rules must match.
- Conditions: Match by ordered product, not ordered product, field value, payment plan, order bump, upsell, or downsell.
- Confirmation Type: Choose display page, perform redirect, or append to URL.
- Select Thank You Page: Choose the page to show.
- Thank You URL: Enter the redirect URL.
- URL String: Add key-value pairs to append to the default confirmation URL.
Notifications #
The Notifications tab controls product-specific emails.
- Disable Order Received Confirmation email: Stop sending the order received email for this product.
- Disable New User Welcome email: Stop sending the new user welcome email for this product.
- Disable Purchase Confirmation email: Stop sending the purchase confirmation email for this product.
Additional Purchase Notifications #
Use additional notifications when you want to send custom emails after purchase.
For each notification, you can configure:
- Notification Label: Add an internal label.
- Send To: Choose enter email, purchaser email, or admin email.
- Send To Email: Enter the recipient email address.
- Advanced sender settings: Override the global sender details for this notification.
- From Name: Change the sender name.
- From Email: Change the sender email.
- Reply To: Add a reply-to address.
- Bcc: Add a Bcc address.
- Subject: Enter the email subject.
- Message: Enter the email content. You can use the available personalization tags.
- Email preview: Preview the email content.
Integrations #
The Integrations tab runs actions after a product event.
Click Renew mailing lists if you need to refresh the available lists from your connected email services.
For each integration, you can configure:
- Service: Choose the integration service.
- Trigger: Choose when the integration runs.
- Restrict by payment plan / purchase type: Run the integration only for selected payment plans or purchase types.
- Require consent: Run the integration only if the customer selected the opt-in checkbox.
Available services depend on your site settings and installed plugins. They can include:
- Create User
- Update User
- ActiveCampaign
- Mailchimp
- MailPoet
- SendFox
- MemberVault
- WishList Member
- Tutor LMS
- Restrict Content Pro
- Webhook
Available triggers include:
- Product Purchased
- Product Refunded
- COD Order Created
- Subscription Active
- Installment Plan Completed
- Subscription Canceled
- Subscription Paused
- Subscription Renewal Charged
- Subscription Renewal Failed
- Lead Captured for 2-step forms
Webhook settings #
If you choose Webhook, you can configure:
- Method: Choose GET or POST.
- Webhook URL: Enter the webhook URL.
- Include headers: Add custom headers.
- Headers: Add one header per line.
- Field Map: Map PublishPress Cart fields to webhook fields.
Other services may show their own fields, such as lists, tags, groups, courses, roles, or membership levels.
Tracking #
The Tracking tab lets you add tracking scripts for this product.
- Lead Captured: Add JavaScript that fires when a lead is captured. This is for 2-step checkout forms.
- Main Product Purchased: Add tracking code that fires when this product is purchased as the main offer.
Use this area for tracking pixels, conversion scripts, or other product-specific scripts.
Shipping #
The Shipping tab adds shipping costs to the product.
- Enable shipping: Turn on shipping for this product.
- Single item: Enter the shipping cost for the first item.
- Single Item (Intl.): Enter the international shipping cost for the first item. Leave it empty to use the single item rate.
- Each additional item: Enter the extra shipping cost for each additional quantity.
- Each additional item (Intl.): Enter the international extra shipping cost for each additional quantity.
- Taxable: Apply tax to shipping when the product is taxable.
International shipping is used when the customer’s country is different from the store country.
Files #
The Files tab lets you attach downloadable files to the product.
For each file, you can configure:
- File ID: The unique internal ID for the file.
- File URL: Upload or select the file.
- File Name: Enter the name customers will see.
- Restrict by payment plan / purchase type: Give access only for specific payment plans or purchase types.
- Download limit: Limit how many times the file can be downloaded.
- Expire download after: Enter a time limit, such as
3 days. Leave it empty to never expire. - Redirect to file: Redirect customers to the file instead of forcing the download.
- Hidden: Hide the download from customer accounts and order emails.
Affiliates #
The Affiliates tab appears when the affiliate extension is active.
- Enable affiliate sales: Allow affiliate tracking and commissions for this product.
- Description: Add a description for affiliates.
Commission #
Use commission settings to control how affiliates are rewarded for this product.
For each commission, you can configure:
- Name (internal): Add an internal commission name.
- Price: Restrict the commission to specific payment plans.
- Type: Choose amount or percentage.
- Amount: Enter a fixed commission amount.
- Percentage: Enter the commission percentage.
- Apply to: Choose whether the percentage applies to the entire funnel, entire order, or this product only.
- Renewal limit (in days): Limit subscription renewal commissions. Leave this empty to award all subscription renewals.