-
General
-
- How to Find the Latest Versions of PublishPress Plugins
- Changelogs for Free PublishPress Plugins
- Changelogs for PublishPress Authors
- Changelogs for PublishPress Blocks
- Changelogs for PublishPress Capabilities
- Changelogs for PublishPress Checklists
- Changelogs for PublishPress Future
- Changelogs for PublishPress Permissions
- Changelogs for PublishPress
- Changelogs for PublishPress Revisions
- Changelogs for PublishPress Series
-
PublishPress Authors
-
- Legacy: How to Create Custom Author Layouts
- Legacy: Add Data in Custom Author Layouts
- Legacy: Using Conditionals in Custom Author Layouts
- Legacy: Add CSS in Custom Author Layouts
- Legacy: The Loop Object in PublishPress Authors
- Legacy: Add External Data to PublishPress Authors
- Legacy: Modify the Author Avatar
- Legacy: Where are Author Layouts Stored in the Database?
- Legacy: Add Social Links to Author Profiles
- Deprecated Functions in PublishPress Authors
-
PublishPress Blocks
-
- Accordion Block
- Button Block
- Columns Block
- Contact Form Block
- Content Display Block
- Countdown Block
- Count Up Block
- Icon Block
- Image Block
- Images Slider Block
- Info Box Block
- Feature List block
- List Block
- Login & Register Block
- Map Block
- Newsletter Block
- Pricing Table block
- Search Bar Block
- Social Links Block
- Table of Contents Block
- Table Block
- Tabs Block
- Testimonial Block
- Video Block
- Woo Products Block
- Core Blocks
- Layout Options in PublishPress Blocks
-
PublishPress Capabilities
-
- The Admin Menus Screen
- Control Access to WooCommerce Admin Menus
- Control Access to Contact Form 7 Admin Menus
- Control Access to Yoast SEO Admin Menus
- Control Access to Elementor Admin Menus
- Control Access to Jetpack Admin Menus
- Control Access to WPForms Admin Menus
- Control Access to The Events Calendar Admin Menus
- Control Access to Gravity Forms Admin Menus
-
PublishPress Checklists
-
- Number of characters in title
- Numbers of words in content
- Number of categories
- Number of tags or taxonomy terms
- Number of characters in excerpt
- Number of internal links in content
- Number of external links in content
- All links use a valid format
- ALT Text for all images
- Featured image
- Latin characters in permalink
- Approved by a user in this role
- Yoast SEO tasks
- WooCommerce product tasks
- Featured image height and width
-
PublishPress Future
- Introduction to PublishPress Future
- Ways to Expire Posts
- Defaults for Post Types
- PublishPress Future Email Notifications
- Shortcodes to Show Expiration Date
- Automatic Footer Display for Expiry Dates
- Scheduling in PublishPress Future: Cron Jobs
- Technical Details for PublishPress Future
- Troubleshooting in PublishPress Future
-
PublishPress Permissions
-
- Control Access to Custom Post Types
- Control Viewing Access to Specific Categories
- Allow Editing of Specific Pages
- Force Users to Create Posts in a Category or Parent Page
- Block Users from Seeing Non-Editable Posts
- Control Viewing Permissions for WordPress Content
- Control Editing Permissions for WordPress Content
- Block Access to WordPress Category and Tag Archives
- Configure Who Can See Other People's Posts
-
- Developer Information for Permission Groups
- PublishPress Permissions Database Tables and Settings
- pp_create_group()
- pp_delete_group()
- pp_get_group()
- pp_get_group_by_name()
- pp_get_metagroup
- pp_get_groups()
- pp_get_group_members()
- pp_get_groups_for_user()
- pp_add_group_user()
- pp_remove_group_user()
- pp_update_group_user()
- ppc_get_roles()
- ppc_assign_roles()
- ppc_get_exceptions()
- ppc_assign_exceptions()
-
PublishPress Planner
-
- Getting Started With Notifications in PublishPress Planner
- Understanding the PublishPress Planner Notification Options
- Get PublishPress Planner Notifications by Email or Slack
- How to Customize PublishPress Planner Notifications With Shortcodes
- How to Use Reminder Notifications
- Notify Me: Manually Add Yourself to Notifications
- The PublishPress Planner Notifications Log
- Hooks and Filters for Notifications
- Troubleshooting Email Notifications in PublishPress Planner
-
PublishPress Revisions
-
- Does My Plugin Support PublishPress Revisions?
- A List of Some Plugins Supported by PublishPress Revisions
- PublishPress Revisions Pro and The Events Calendar
- PublishPress Revisions Pro and WooCommerce
- PublishPress Revisions Pro and Advanced Custom Fields
- PublishPress Revisions Pro and WPML
- PublishPress Revisions Pro and Custom Post Type UI
- PublishPress Revisions Pro and Yoast SEO
- PublishPress Revisions Pro and the PODS Framework
- Submit and Moderate Revisions with the Divi Theme
- Create Revisions Using an API
- PublishPress Revisions Pro and Elementor
- PublishPress Revisions Pro and Beaver Builder
-
PublishPress Series
-
How-to Guides
-
- A WordPress Editorial Workflow for Writing, Reviewing and Publishing
- A WordPress Workflow for Editing and Reviewing
- Create a Workflow for University Departments in WordPress with PublishPress
- Create a Multi-Step Workflow in WordPress
- How to Create a Publishing Workflow for Authors in WordPress
- How to Get 2 People to Approve Content in WordPress
-
- How to Allow WordPress Admin Area Access for WooCommerce Users
- How to Manage Permissions for WooCommerce Products
- Allow WooCommerce Users to Edit Only One Product
- How to Approve and Schedule Changes to WooCommerce Products
- WooCommerce Users Can Edit Products Only in Some Categories
- How Create WooCommerce Users Who Can Only View and Edit Products
- How to Create and Schedule Revisions for WooCommerce Products
- How to Control Who Can Duplicate WooCommerce Products
- Create WooCommerce Users Who Can Only View Reports
- How to Control Who Can Access WooCommerce Coupons
- How to Create WooCommerce Users Who Can Only View and Edit Orders
- How to Manage Permissions for WooCommerce Orders
- How to Control Permissions for WooCommerce Refunds
- How to Create Checklists with WooCommerce
-
-
WordPress Permissions
-
- activate_plugins
- add_users
- create_users
- delete_others_pages
- delete_others_posts
- delete_pages
- delete_posts
- delete_plugins
- delete_private_pages
- delete_private_posts
- delete_published_pages
- delete_published_posts
- delete_themes
- delete_users
- edit_dashboard
- edit_others_pages
- edit_others_posts
- edit_pages
- edit_plugins
- edit_posts
- edit_private_pages
- edit_private_posts
- edit_published_pages
- edit_published_posts
- edit_theme_options
- edit_themes
- edit_users
- erase_others_personal_data
- export
- export_others_personal_data
- import
- install_plugins
- install_themes
- list_users
- manage_categories
- manage_links
- manage_options
- manage_privacy_options
- moderate_comments
- promote_users
- read
- read_private_pages
- read_private_posts
- remove_users
- switch_themes
- unfiltered_html
- unfiltered_upload
- update_core
- update_plugins
- update_themes
- upload_files
Private Posts and Pages for WordPress User Groups
In this tutorial, we'll show you how to private posts and pages for some of your WordPress site users. This guide has more details on private content in WordPress.
This is what we'll do in this guide:
- Use a custom privacy status to control who can see some pages.
- Default newly published pages to that privacy status.
- Allow a limited set of users to access those pages.
All of this is possible with the PublishPress Permissions Pro plugin.
In this guide, we'll create a status called “Legal Team” that is automatically given to new Pages. These Pages will only be accessible to users in the “Authors” role.
Create the new status
First, we'll create a new status to protect our content.
- Go to “Permissions”, then “Post Statuses”.
- Click the “Visibility” tab.
- You'll see “Private”, plus three extra privacy statuses: “Member”, “Premium” and “Staff”.

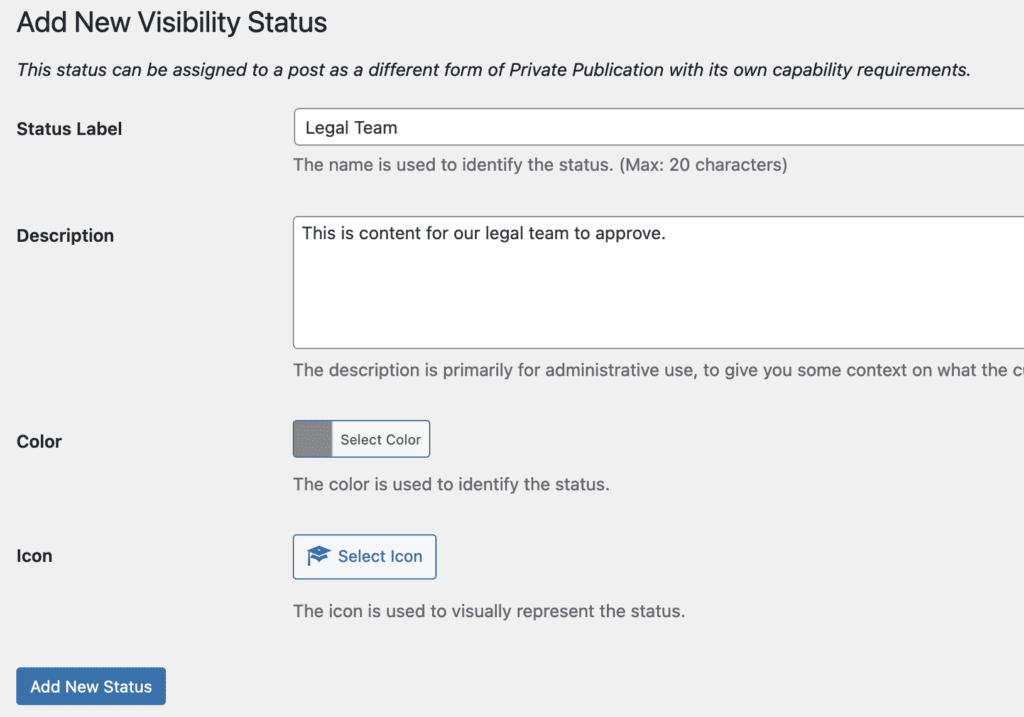
- Click the “Add New” button.
- We will create a new status and choose to use it only for “Pages”.
- Click “Create”.

Make the status the default for new Pages
Next we will make sure that “Legal Team” is the default status for new pages.
- Go to “Permissions”, then “Settings”.
- Click the “Editing” tab.
- Under “Pages”, choose “Legal Team” as the default.
- You can also check the “lock” option so that no other status can be selected.

- When you create a new page, the visibility will be set to “Legal Team” by default. It will be impossible to choose another option.

- If a Page is published, you will see a dropdown option for “Visibility”. But will only allow you to unpublish the content by moving it to “Draft”.

- Every Page created in the future will now have the “Legal Team” status and will be marked on the main “Pages” screen:

Give users access to this new status
Our final step will be to give some users access to this new “Legal Team” status. We're going to give access to the “Authors” role.
- Go to “Permissions”, then “Groups”.
- Click “Edit” under “WP Author”.

We are going to give people in the Authors role some additional permissions for pages with the “Legal Team” status. For these pages alone, they will also be a “Subscriber” and able to read the content.
- Choose the “Add Supplemental Role” tab.
- Post Type: choose “Page”.
- Role: choose “Subscriber”.
- Visibility: choose “Legal Team”/
- Click “Add Role”.
- Click “Save Role.

You can now test out your new Pages. Only people in the Author role can see Pages with the “Legal Team” status. Everyone else will get a “Page Not Found” error. You could also use PublishPress Permissions to create a Teaser if you wanted to entice people to join your site and get access to this private content.