-
General
-
- How to Find the Latest Versions of PublishPress Plugins
- Changelogs for Free PublishPress Plugins
- Changelogs for PublishPress Authors
- Changelogs for PublishPress Blocks
- Changelogs for PublishPress Capabilities
- Changelogs for PublishPress Checklists
- Changelogs for PublishPress Future
- Changelogs for PublishPress Permissions
- Changelogs for PublishPress
- Changelogs for PublishPress Revisions
- Changelogs for PublishPress Series
-
PublishPress Authors
-
- Legacy: How to Create Custom Author Layouts
- Legacy: Add Data in Custom Author Layouts
- Legacy: Using Conditionals in Custom Author Layouts
- Legacy: Add CSS in Custom Author Layouts
- Legacy: The Loop Object in PublishPress Authors
- Legacy: Add External Data to PublishPress Authors
- Legacy: Modify the Author Avatar
- Legacy: Where are Author Layouts Stored in the Database?
- Legacy: Add Social Links to Author Profiles
- Deprecated Functions in PublishPress Authors
-
PublishPress Blocks
-
- Accordion Block
- Button Block
- Columns Block
- Contact Form Block
- Content Display Block
- Countdown Block
- Count Up Block
- Icon Block
- Image Block
- Images Slider Block
- Info Box Block
- Feature List block
- List Block
- Login & Register Block
- Map Block
- Newsletter Block
- Pricing Table block
- Search Bar Block
- Social Links Block
- Table of Contents Block
- Table Block
- Tabs Block
- Testimonial Block
- Video Block
- Woo Products Block
- Core Blocks
- Layout Options in PublishPress Blocks
-
PublishPress Capabilities
-
- The Admin Menus Screen
- Control Access to WooCommerce Admin Menus
- Control Access to Contact Form 7 Admin Menus
- Control Access to Yoast SEO Admin Menus
- Control Access to Elementor Admin Menus
- Control Access to Jetpack Admin Menus
- Control Access to WPForms Admin Menus
- Control Access to The Events Calendar Admin Menus
- Control Access to Gravity Forms Admin Menus
-
PublishPress Checklists
-
- Number of characters in title
- Numbers of words in content
- Number of categories
- Number of tags or taxonomy terms
- Number of characters in excerpt
- Number of internal links in content
- Number of external links in content
- All links use a valid format
- ALT Text for all images
- Featured image
- Latin characters in permalink
- Approved by a user in this role
- Yoast SEO tasks
- WooCommerce product tasks
- Featured image height and width
-
PublishPress Future
- Introduction to PublishPress Future
- Ways to Expire Posts
- Defaults for Post Types
- PublishPress Future Email Notifications
- Shortcodes to Show Expiration Date
- Automatic Footer Display for Expiry Dates
- Scheduling in PublishPress Future: Cron Jobs
- Technical Details for PublishPress Future
- Troubleshooting in PublishPress Future
-
PublishPress Permissions
-
- Control Access to Custom Post Types
- Control Viewing Access to Specific Categories
- Allow Editing of Specific Pages
- Force Users to Create Posts in a Category or Parent Page
- Block Users from Seeing Non-Editable Posts
- Control Viewing Permissions for WordPress Content
- Control Editing Permissions for WordPress Content
- Block Access to WordPress Category and Tag Archives
- Configure Who Can See Other People's Posts
-
- Developer Information for Permission Groups
- PublishPress Permissions Database Tables and Settings
- pp_create_group()
- pp_delete_group()
- pp_get_group()
- pp_get_group_by_name()
- pp_get_metagroup
- pp_get_groups()
- pp_get_group_members()
- pp_get_groups_for_user()
- pp_add_group_user()
- pp_remove_group_user()
- pp_update_group_user()
- ppc_get_roles()
- ppc_assign_roles()
- ppc_get_exceptions()
- ppc_assign_exceptions()
-
PublishPress Planner
-
- Getting Started With Notifications in PublishPress Planner
- Understanding the PublishPress Planner Notification Options
- Get PublishPress Planner Notifications by Email or Slack
- How to Customize PublishPress Planner Notifications With Shortcodes
- How to Use Reminder Notifications
- Notify Me: Manually Add Yourself to Notifications
- The PublishPress Planner Notifications Log
- Hooks and Filters for Notifications
- Troubleshooting Email Notifications in PublishPress Planner
-
PublishPress Revisions
-
- Does My Plugin Support PublishPress Revisions?
- A List of Some Plugins Supported by PublishPress Revisions
- PublishPress Revisions Pro and The Events Calendar
- PublishPress Revisions Pro and WooCommerce
- PublishPress Revisions Pro and Advanced Custom Fields
- PublishPress Revisions Pro and WPML
- PublishPress Revisions Pro and Custom Post Type UI
- PublishPress Revisions Pro and Yoast SEO
- PublishPress Revisions Pro and the PODS Framework
- Submit and Moderate Revisions with the Divi Theme
- Create Revisions Using an API
- PublishPress Revisions Pro and Elementor
- PublishPress Revisions Pro and Beaver Builder
-
PublishPress Series
-
How-to Guides
-
- A WordPress Editorial Workflow for Writing, Reviewing and Publishing
- A WordPress Workflow for Editing and Reviewing
- Create a Workflow for University Departments in WordPress with PublishPress
- Create a Multi-Step Workflow in WordPress
- How to Create a Publishing Workflow for Authors in WordPress
- How to Get 2 People to Approve Content in WordPress
-
- How to Allow WordPress Admin Area Access for WooCommerce Users
- How to Manage Permissions for WooCommerce Products
- Allow WooCommerce Users to Edit Only One Product
- How to Approve and Schedule Changes to WooCommerce Products
- WooCommerce Users Can Edit Products Only in Some Categories
- How Create WooCommerce Users Who Can Only View and Edit Products
- How to Create and Schedule Revisions for WooCommerce Products
- How to Control Who Can Duplicate WooCommerce Products
- Create WooCommerce Users Who Can Only View Reports
- How to Control Who Can Access WooCommerce Coupons
- How to Create WooCommerce Users Who Can Only View and Edit Orders
- How to Manage Permissions for WooCommerce Orders
- How to Control Permissions for WooCommerce Refunds
- How to Create Checklists with WooCommerce
-
-
WordPress Permissions
-
- activate_plugins
- add_users
- create_users
- delete_others_pages
- delete_others_posts
- delete_pages
- delete_posts
- delete_plugins
- delete_private_pages
- delete_private_posts
- delete_published_pages
- delete_published_posts
- delete_themes
- delete_users
- edit_dashboard
- edit_others_pages
- edit_others_posts
- edit_pages
- edit_plugins
- edit_posts
- edit_private_pages
- edit_private_posts
- edit_published_pages
- edit_published_posts
- edit_theme_options
- edit_themes
- edit_users
- erase_others_personal_data
- export
- export_others_personal_data
- import
- install_plugins
- install_themes
- list_users
- manage_categories
- manage_links
- manage_options
- manage_privacy_options
- moderate_comments
- promote_users
- read
- read_private_pages
- read_private_posts
- remove_users
- switch_themes
- unfiltered_html
- unfiltered_upload
- update_core
- update_plugins
- update_themes
- upload_files
How to Create a Publishing Workflow for Authors in WordPress
We received an email from a PublishPress user who wanted to set up a content workflow for their team.
This list below shows the workflow they wanted. Administrators will assign content to Authors who write the content and then submit it back to the Administrators for publishing.
- I will add people to an “Authors” user group. Their permissions will be to send content to statuses such as “In Progress”, “Draft”, and “Pending Review”.
- When an Author has finished their work, they will move it to “Pending Review”.
- When a post moves to “Pending Review”, the administrators will get notified that post is ready for review.
- Based on the PublishPress Checklists, a number of things must be done before publishing the post: correct category selected, correct tags added, etc.
Let's show you how this is done in PublishPress:
Step #1. Install the Plugins
For this tutorial, we'll be using three plugins:
Install all three of these in your WordPress site.
Step #2. Add user to a role
Our next step will be to create some authors who will write our content.
- Go to Users > Add New.
- Create new accounts for each author.
- When creating the account, place the users into the “Author” role.

Step #3. Permissions for Authors
Now we're going to control what authors can and can not do. If you're new to WordPress, here's a guide to what authors can and can not do in a default WordPress site.
The PublishPress Capabilities Pro plugin is the way you can customize the default Author permissions. This add-on controls which statuses are available to user roles.
- Go to “Capabilities” then “Settings” in your admin menu.
- Check the box “Control Custom Statuses”.
- Go to “Capabilities” in your admin menu.
In the center of the screen, you can now customize permissions for statuses.
- Use the “Select Role to View / Edit” box to load “Author”.
- You can now set permissions for custom statuses:

Step #4. Notifications for Administrators
Now that our permissions are ready, let's set up notifications so that everyone gets notified at the right times.
- Go to PublishPress > Notifications.
- Click “Add New”.
- Title: Notify Editors of New Content from Authors
- When to Notify: Here you can choose to notify people when content in “Assigned”, “In Progress” or “Draft” is moved to the “Pending Review” status.
- Filter the content? Choose “Post” as the Post type.
- Who to notify? Choose the people who will approve the content.

If you want, you can add more notifications for other groups. For example, you can notify “Authors of the content” when content is sent to the “Assigned” status.
Step #5. Publish With the Checklist
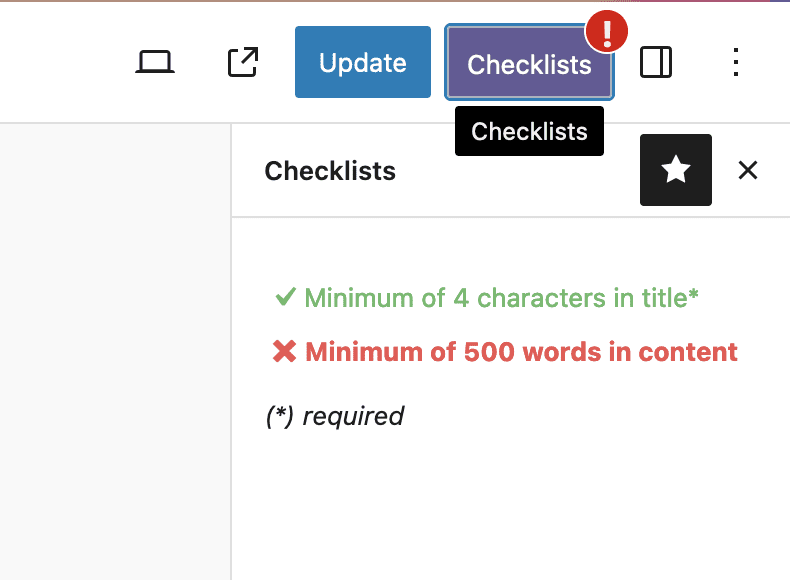
The PublishPress Checklists plugin allows you to set criteria that your writers should (or have to!) follow.
This add-on allows you to set a maximum and minimum value for categories, tags, and words. For example, you can now ask your users to write between 100 and 500 words or add between 3 and 5 tags.
Here’s how the Checklist appears in the WordPress writing area:

- Go to Checklists > Settings and you can create the requirements that you want people to complete before a post is published.
Step #6. Test
Now your workflow is complete. It's time to test to make sure everything works correctly:
- Have an “Editor” user create a post and assign an “Author” user as the content author. Do they get an email?
- Have the “Author” log in. Can they move the content to the “In Progress” or “Draft” and “Pending Review” status?
- Do “Editor” and “Administrator” users get an email when posts are moved to “Pending Review”?
- Does the Checklists work as you want?