
A PublishPress user asked us if it was possible to set up this workflow:
- One user role can edit or add content, but not publish.
- Another user role can review the content and change the status to “Reviewed”. However, they are not able to publish content.
- An admin user can approve or publish the content.
The answer to this is “Yes, with the PublishPress plugins”. I’ll show you how to set up this workflow using two plugins:
Before we start this process, make sure you have both of these plugins installed.
Step #1. The Content Editor #
Our first task is to create a “Content Editor” role that can edit or add content, but not publish. We will copy the “Contributor” role because that has permissions very close to our desired goal.
- Go to “Capabilities” in your WordPress admin area.
- Open the “Roles” sub menu.
- Click “copy” under Contributor role.
- Enter “Content Editor” as the role name.
- Click “Create Role”.

- In the center of the screen, check the three boxes shown below. We will leave “Publish” empty because we don’t want these users to publish content.

I would recommend that you now create a user in the “Content Editor” role and test their account. This is easier to do with the User Switching plugin installed.
What should you see? The “Content Editor” users can edit any post. However, if they try to publish a new post, they will see the image below. They will only be able to leave a post as “Submit for Review“.

Step #2. The Reviewer #
Our next step is to create a “Reviewer” role that can review content and change the status to “Reviewed”. However, the reviewer is not able to publish content.
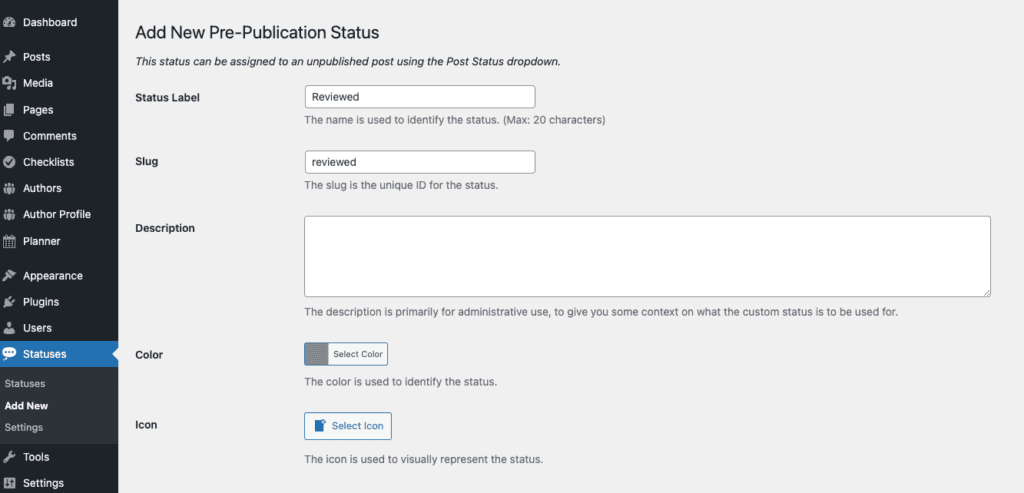
First, we’re going to create a new status called “Reviewed”.
- Go to Statuses menu.
- Click “Add New”.
- Create a new status called “Reviewed”.
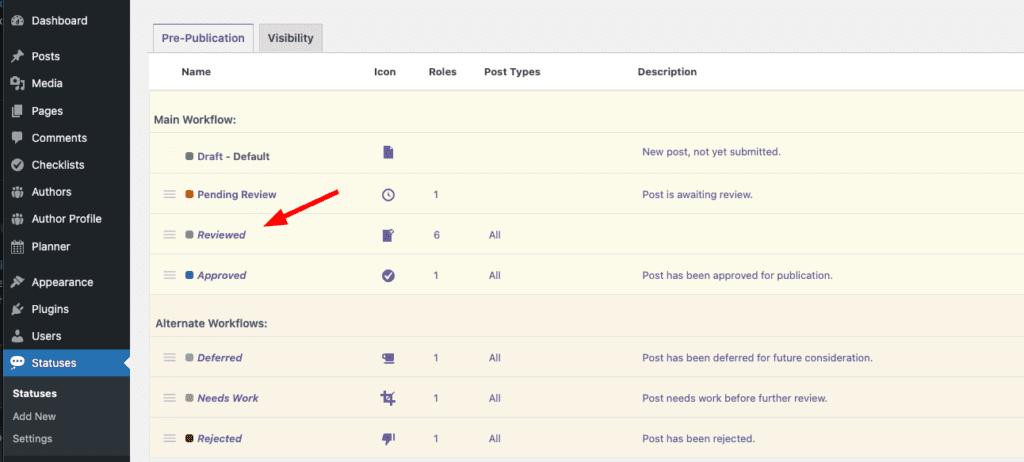
- Drag-and-drop the new status so that it appears after “Pending Review”:
- Make sure you have the “Control selection of custom post statuses” box checked under the “Capabilities” tab.

Go to the “Capabilities” screen and you can now customize permissions for statuses.
- Select the “Content Editor” role.
- Set these permissions for custom statuses:

- Use the “Select Role to View / Edit” box to load “Reviewer”.
- Set these permissions for custom statuses:

As before, it’s now time to create and test a new user in this “Reviewer” role. You are looking for two things:
- They can not publish. Just like the “Content Editor”, they will not be able to publish.
- When they are editing content,they will be able to move content from “Pending Review” to “Reviewed”.

Step #3. The Admin #
You can use a normal Administrator account for the final step. These users can approve or publish the content. You could also use an “Editor” user.
Step #4. Test the Workflow #
Log into your site and test the process:
- The “Content Editor” can edit or add content. They can move content to the “Pending Review” status.
- The “Reviewer” can review the content and change the status to “Reviewed”.
- The “Admin” can approve or publish the content.