
How to Create a WordPress Table of Contents for a Post
If you write really long articles in WordPress, it can very helpful to have a table of contents at the top of the post.
This table of contents is as a quick summary so readers can scan the content and perhaps jump down to a topic they’re really interested in.
In this post, I’ll show you two ways to add a table of contents to your WordPress site. The first method will use the new Gutenberg editor. The second method will use the old Classic Editor.
Oh, and if you want a live demo of what we’re taking about, check out this table of contents. We generated it for this post, using Method #1:
- Method #1. A Table of Contents with the Gutenberg editor
- Method #2. A Table of Contents with the Classic Editor
- Install Easy Table of Contents
- Easy Table of Contents configuration
- General Settings
- Appearance
- Advanced
- Creating a WordPress Table of Contents
- Summary
- More useful WordPress plugin recommendations
- Get the PublishPress plugins
Table of Contents
Method #1. A Table of Contents with the Gutenberg editor
With the PublishPress Blocks plugin, you can insert a table of contents into the Gutenberg editor.
The “Summary” block allows you to show a Table of Contents for your posts created with Gutenberg. The plugin will automatically create this Table of Contents using the headings in your post.

- To get started, install the PublishPress Blocks plugin.
- Go to edit a post on your site.
- Create at least one Heading tag in the post or page.
- Choose the Summary block by clicking its button in the PublishPress Blocks category.

The summary can be aligned to the Left, Center or Right:

If you have the changed the text on your page, you can also update the summary. Use the “Update Summary” button:

In the right sidebar, there are some options that you can adjust:
- Load minimized: If you enable this feature, the Summary will be hidden by default. Users will need to click the Summary header title text to see the Summary.
- Summary header title: This is shown when the Load minimized option is enabled
- Anchor color: pick a color for the Summary links.

If you do choose the “Load minimized” option then you’ll be asked to enter a title. Visitors to your site will see that title and a down arrow. Then can click that down arrow to see the full tablle of contents.

Method #2. A Table of Contents with the Classic Editor
With the Easy Table of Contents plugin, you can insert a table of contents in a WordPress post. Every heading in the post will be accessible through a link at the beginning. This image shows the plugin in action:

This tutorial will explain the installation and basic usage of the Easy Table of Contents plugin.
Install Easy Table of Contents
- In your WordPress site, click Plugins > Add new.
- Type easy table in the search box.
- Choose the Easy Table of Contents plugin.
- Click Install now and then Activate.

Easy Table of Contents configuration
- On the Plugins page, click the Settings link for your new plugin.

The Easy Table of Contents configuration is divided into three main areas:
- General
- Appearance
- Advanced
General Settings
The General settings control how and where table of contents appear on your site.
By default, the table of contents will only appear on Pages. You can change that using the “Enable Support” option at the top of the screen.
You can also control whether or not the table of contents is inserted automatically. In the image below, the table is being automatically inserted into all my Posts.
- Check Auto insert posts
- Leave the default Heading position

A little further down the screen, you can control where the table of contents appears. I’ve choosen “Before first heading”. This is the position you can see in the very top image in this tutorial.

Scroll further down and you can customize the table of contents in more ways. Here are some of my recommendations:
- Change the number of headings to 3
- Edit the Header label
- Change the Counter style to Roman
- Leave the other default values

Appearance
The Appearance section allows you to configure the look and style of the table of contents, including the size of the fonts. Again, I’ll give you some recommended settings, based on my testing of the plugin.
- Leave the default Auto width
The custom width option does not apply since the default width is Auto.
- Change the Title font size
- Change the Text font size
- Choose Custom, to create a customized style for the Table of contents

- Change the Custom theme colors according to your taste, or to the design mockup
Notice that there is a button to reset the color to its default style, in case you want to start over from the default style.

Advanced
This final section has small tweaks to deeply customize your table of contents.
One very useful option is “Exclude Headings”. This is useful if your article is very long and you do not want to clutter the table with subtopics (for example headings in the fifth or sixth level). You can also exclude headings that aren’t content-related: for example “Advertisement” or “Sponsored”. The image below the * character is a wildcard.

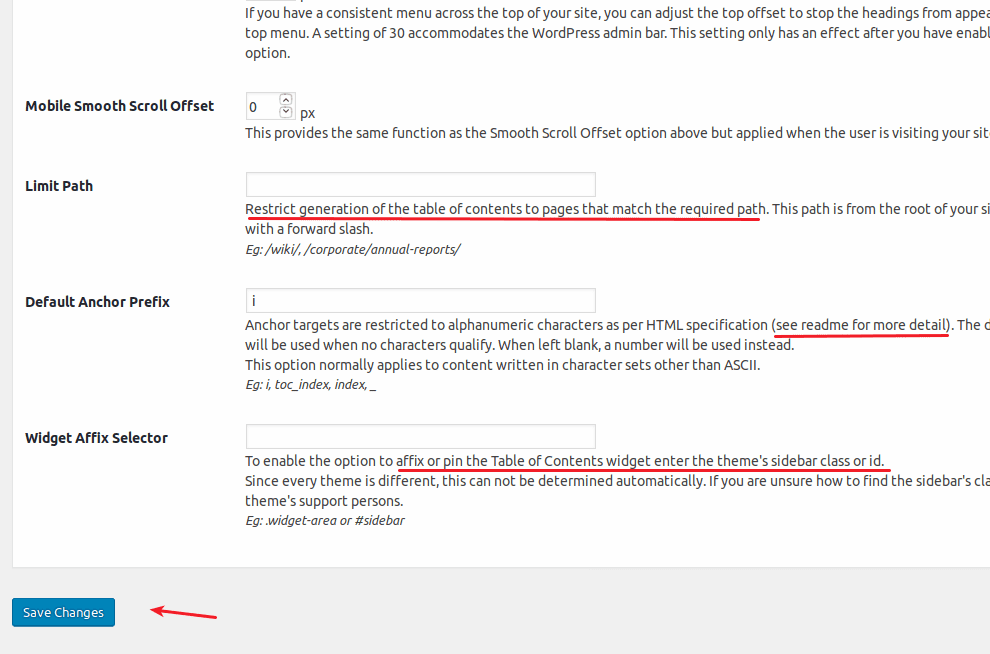
The last configuration options refer to several key features
- The offset that has to be preserved when scrolling (the scroll effect) on desktop or mobile devices.
- Limiting the path to pages with a certain URL pattern (this provides great flexibility).
- Pinning the table of contents inside a widget area (sidebar).
Creating a WordPress Table of Contents
- Create a post with multiple headings
- Make sure you include h5 and h6 headings.
- Include these two headings:
- Sponsored content
- Advertisement
One thing to notice is that you can override the global settings of Easy Table of Contents per post. This provides even more flexibility since you can customize each one of the content tables to your specific needs.

Summary
Both PublishPress Blocks and the Easy Table of Contents plugin can insert a content table into your WordPress posts. Each link of the list takes the reader to that section of the article. This is very useful on particularly long articles because it helps visitors get a clear overview of the whole text.
More useful WordPress plugin recommendations
- How to link words in a WordPress post to a glossary
- Allow guests to submit content to your WordPress site
- How to enable lazy loading for WordPress comments
- Keep a log of all your site activity
Get the PublishPress plugins
Join PublishPress today and you’ll get powerful publishing and permissions plugins to improve your WordPress site.

Your Complete Toolkit for the WordPress Block Editor
PublishPress Blocks is the plugin that gives you more control over the WordPress block editor. You get a complete set of management tools for your blocks.


How do i print it manually in template ***.php ??